If you have a SQL Server Availability Group (AG) and the VMs are being replicated to a disaster recovery site (cloud or on-prem), chances are the networking topology is not the same at the second site. These replication technologies can include VM replication, SAN LUN replication, or replicating server-level backups to the second site. It is quite complex to have the same network subnet existing at both sites, so usually, the secondary site contains a different networking subnet structure. It means that the servers being brought up at the secondary site are going to receive different IP addresses.
The Availability Group architecture, especially with its dependency on the Windows Server Failover Cluster (WSFC) layer, are quite intolerant of having these IP addresses changed. The utilities performing the failover might not even be aware of the WSFC-specific components that need to be adjusted.
Keep in mind that you could have a third AG member configured for asynchronous replication at the DR facility constantly receiving the stream of data changes, but this provides more complexity and components. Some organizations would rather just have the VMs replicated to have a single method for disaster recovery replication.
To boost the speed of failover to have your SQL Server up and running as fast as needed for the disaster, several components need to be adjusted to help the platform get up and running. The good thing is that you can do this ahead of an actual failover so that the failover process is as straightforward as possible. The goal is to have everything we need ready to go for the minimal amount of work to get the new servers up at the DR site.
To start, map out the IP addresses for your current network setup. For an AG in a single subnet configuration, the configuration could look like this.
Object | IP Address |
SQL2019AG03A (server) | 10.100.56.25 |
SQL2019AG03B (server) | 10.100.50.26 |
SQL2019AG03CL (cluster IP) | 10.100.50.31 |
SQL2019AG03LS (AG listener) | 10.100.50.32 |
To speak in terms of subnets, these objects all reside on the 10.100.50.X networking subnet. In my lab, they’re all on a virtual network tagged for VLAN 50.
Our target disaster recovery site will be simulated in my lab by VLAN 61. Map out IP addresses at the DR site. In my scenario, the third octet changes to 61, but I’ll keep the fourth the same for continuity sake. Work with your infrastructure team to make sure the IP addresses are available and reserved.
Object | IP Address | DR IP Address |
SQL2019AG03A (server) | 10.100.56.25 | 10.100.61.25 |
SQL2019AG03B (server) | 10.100.50.26 | 10.100.61.26 |
SQL2019AG03CL (WSFC IP) | 10.100.50.31 | 10.100.61.31 |
SQL2019AG03LS (AG listener) | 10.100.50.32 | 10.100.61.32 |
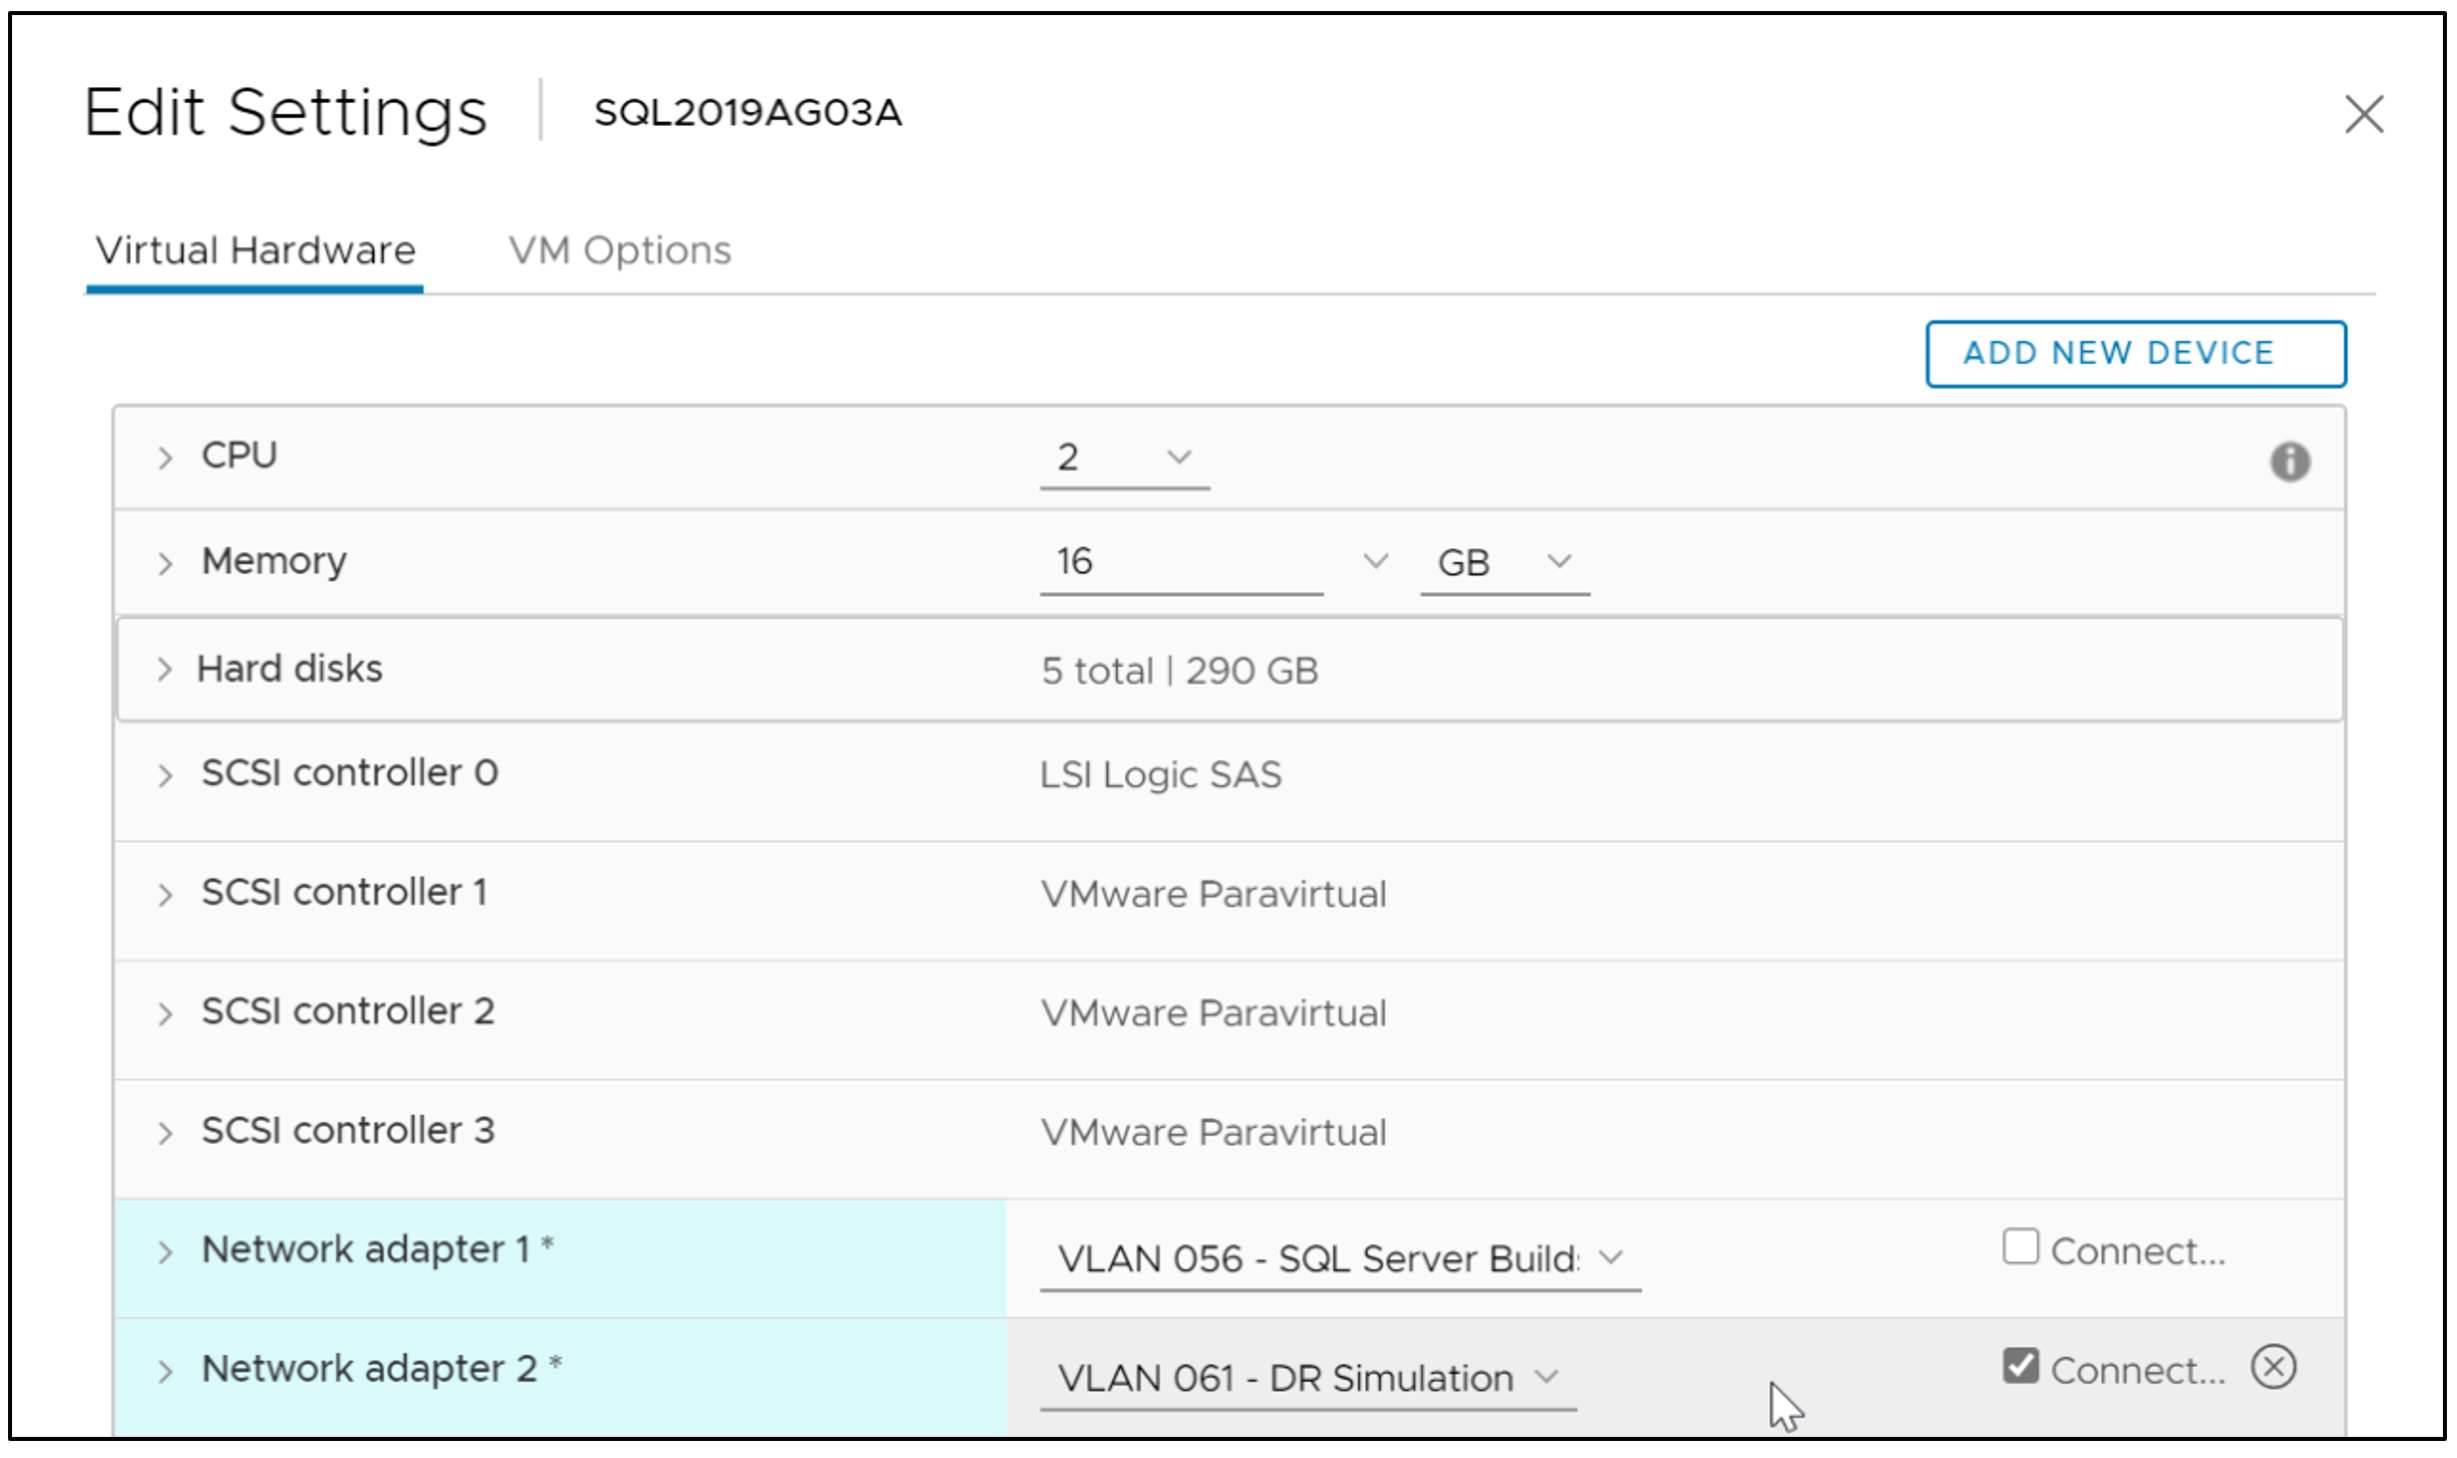
First, let’s add a second network adapter to the virtual machines. It can be any hypervisor out there, and I’m using VMware to do this in my lab. Add a second network adapter to each of your servers. Make sure the networking assignment corresponds to the alternate subnet. If it doesn’t exist in the primary site, have the network administrators create a nonroutable network that simulates this other network segment.

Do not connect the second network adapter at this time. Networking settings like DHCP could automatically assign this network adapter an IP address, and could interrupt your current configuration and disrupt operations.
In each server, find the second network adapter in the list of network adapters. It will show up as the one offline. Feel free to rename this network adapter appropriately if you wish.

Right click, edit the properties, select Internet Protocol Version 4, and click properties. Enter your IP address and subnet mask for this server into the prompts, but do not set a gateway and DNS server at this time.

Do this for each server.
Now, jump back into the VM administration portal and set those network adapters online. They won’t go anywhere, but will give us the ability to set them online within the WSFC layer to finish configuring this setup.

The next step is to create a new network IP address for use by the WSFC itself on the alternate subnet. Since we’re modifying the existing WSFC, we’ll use PowerShell to add the new IP address to the WSFC.
Issue the following commands from an elevated PowerShell prompt.

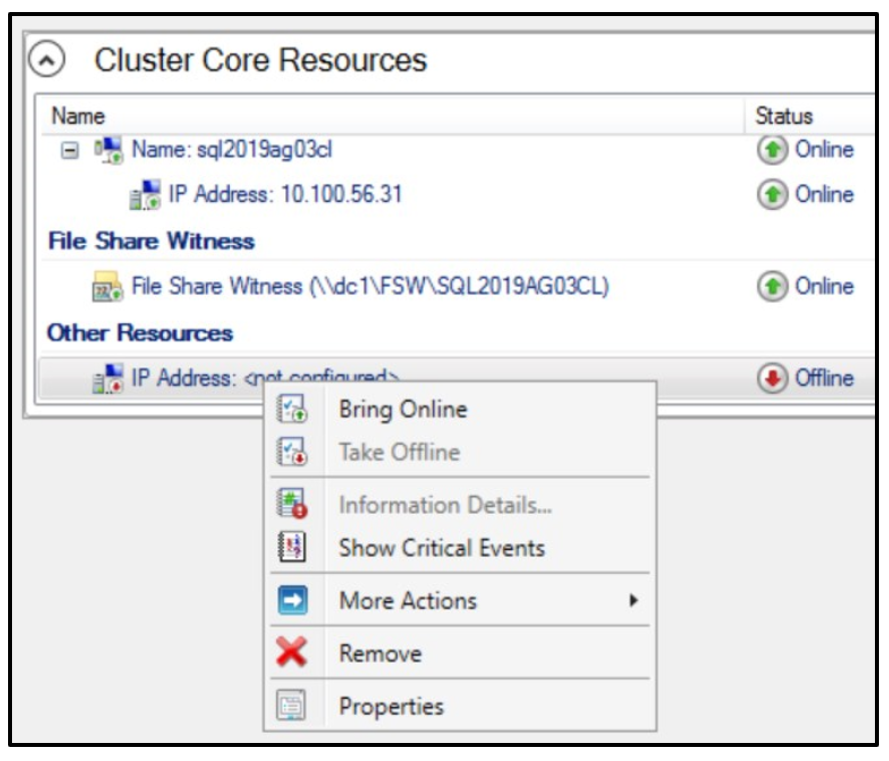
When you go back to the Failover Cluster Manager, you will now see a second IP address, currently not configured, listed as an Other Resource and marked online.

Next, go to the Networks option on the left. You will see the two networks available the cluster. I have renamed the second network as DR so that I can quickly identify this as the disaster recovery network.

We need to set the DR network as available to both Cluster and Client, and not Cluster Only. Right click on it, and click Properties.

We want to select ‘Allow clients to connect through this network’ so that the Cluster VIP can be successfully added. Check the box and select OK.
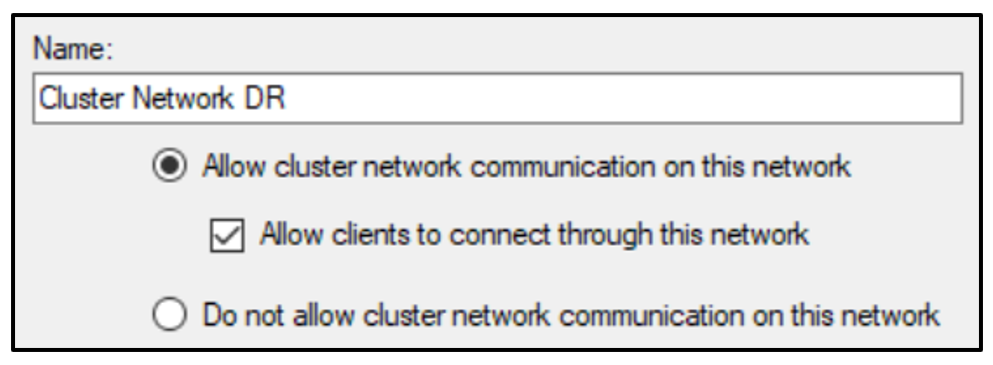
You will see this popup. Click OK.

At this point, it should list both IP addresses as online.

Now, select the Cluster again to go back to the main screen.
Right click on the cluster and select Properties.
Change the Network assignment to the network for the new subnet, which should now appear in the list.

Enter a static IP address, previously identified, into the static IP address in the bottom and click OK.

Your new IP address is now visible in the Cluster Core Resources list, but still marked offline. We need to now update the cluster itself to allow for it to use either IP address. Right click on the cluster itself, and select Properties.
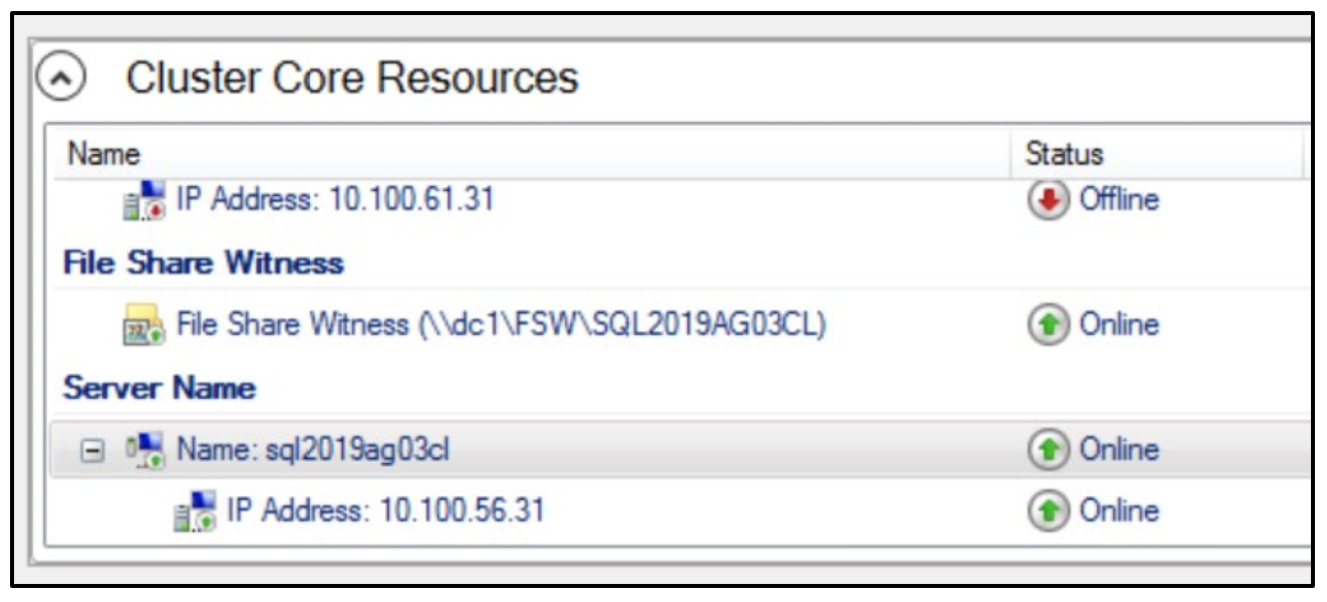
Click on Dependencies. You’ll see the single IP address for the primary subnet listed.

We want to add an ‘OR’ dependency by clicking Insert and select the new IP address as the resource. This configuration will allow the cluster to use either IP address to communicate.
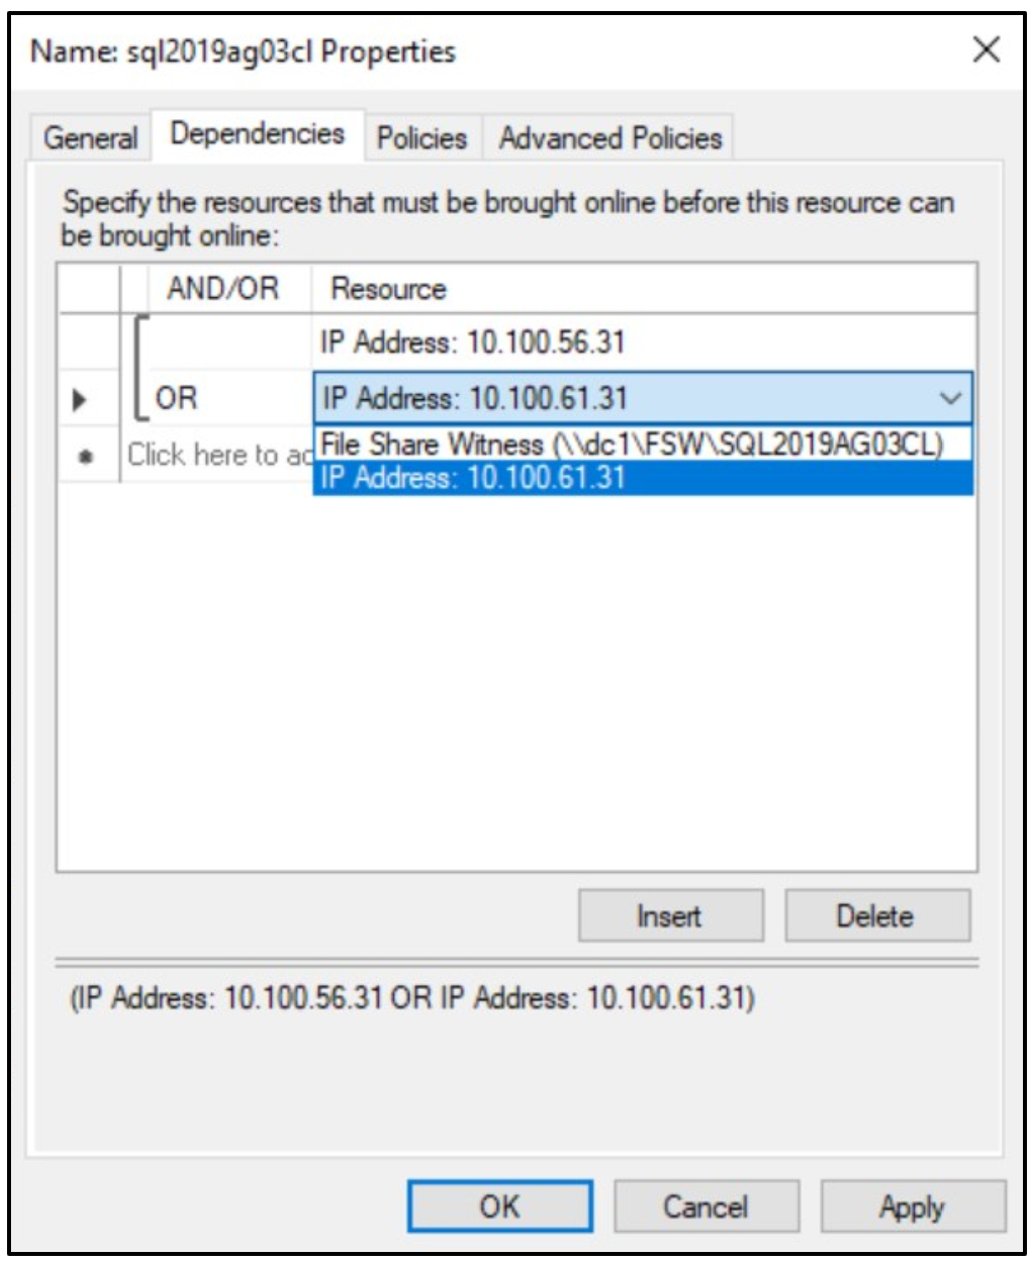
Click OK and you will now see both IP addresses listed under the cluster itself, with the new one still marked offline.
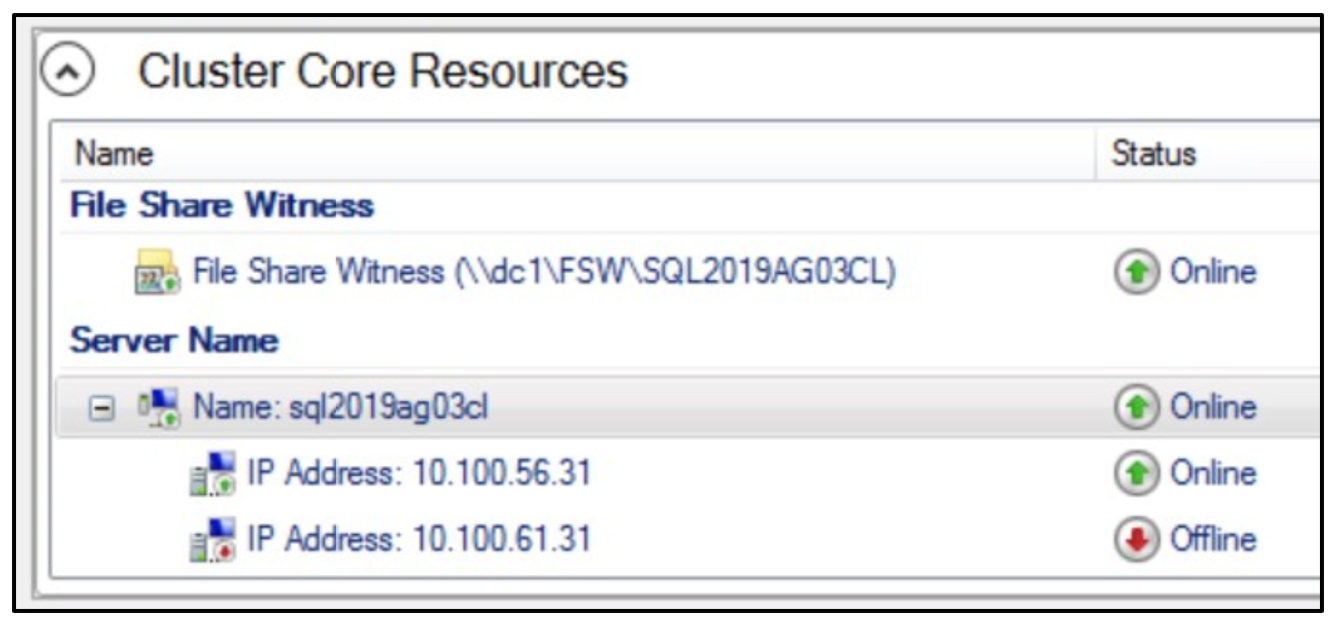
This cluster is now good to go. Now, let’s get the SQL Server AG listener updated. Go into SSMS, connect to the primary replica in the AG, expand the AG and AG listener, and right click on the listener and click properties.

You will probably see one listener IP address listed, and it is on the primary subnet. Click Add and enter the new IPv4 address with the new subnet selected, and click OK.

You should now see the new IP address listed under the AG listeners.

Click OK to save it. If there are any issues at this step, the cluster or AG objects within Active Directory need their permissions checked to ensure it has the proper permissions to create this entry.
At this point, go back into the hypervisor and disconnect the new virtual network adapter on each server so that we have locked down communication.
Next, edit the Windows network adapter properties on each server and add the default gateway and preferred DNS server for the DR site. Check with your network administrator to get these values. Click OK.
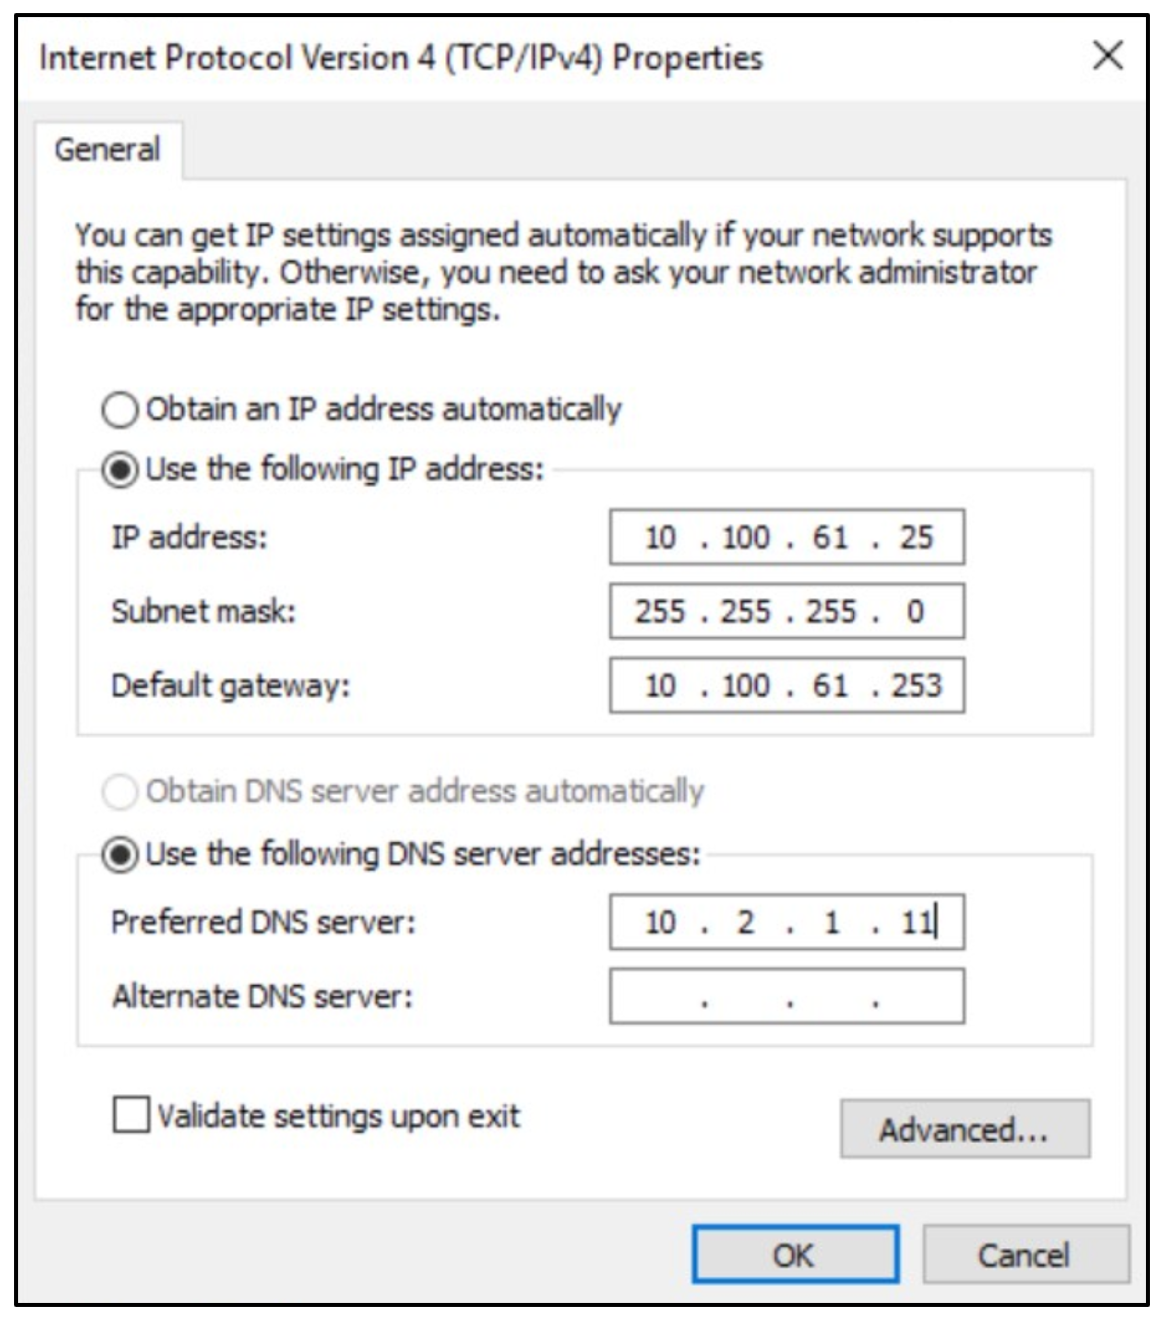
At this point, you should be ready to test a failover.
In theory, if all of the stars align, performing the VM failover should mean that both servers get the primary network adapter disconnected, the second network adapter connected, and they should fire up at the secondary site. Your mileage might vary, as there could be other networking factors in place, but those can be worked through as soon as you start testing.
To simulate this in my lab, I powered off the servers (to simulate a VM backup that is replicated while the source server was still on), reconfigured the VM network adapters by disconnecting the first and connecting the second, and powered back on the VMs, primary replica first and secondary replica second.
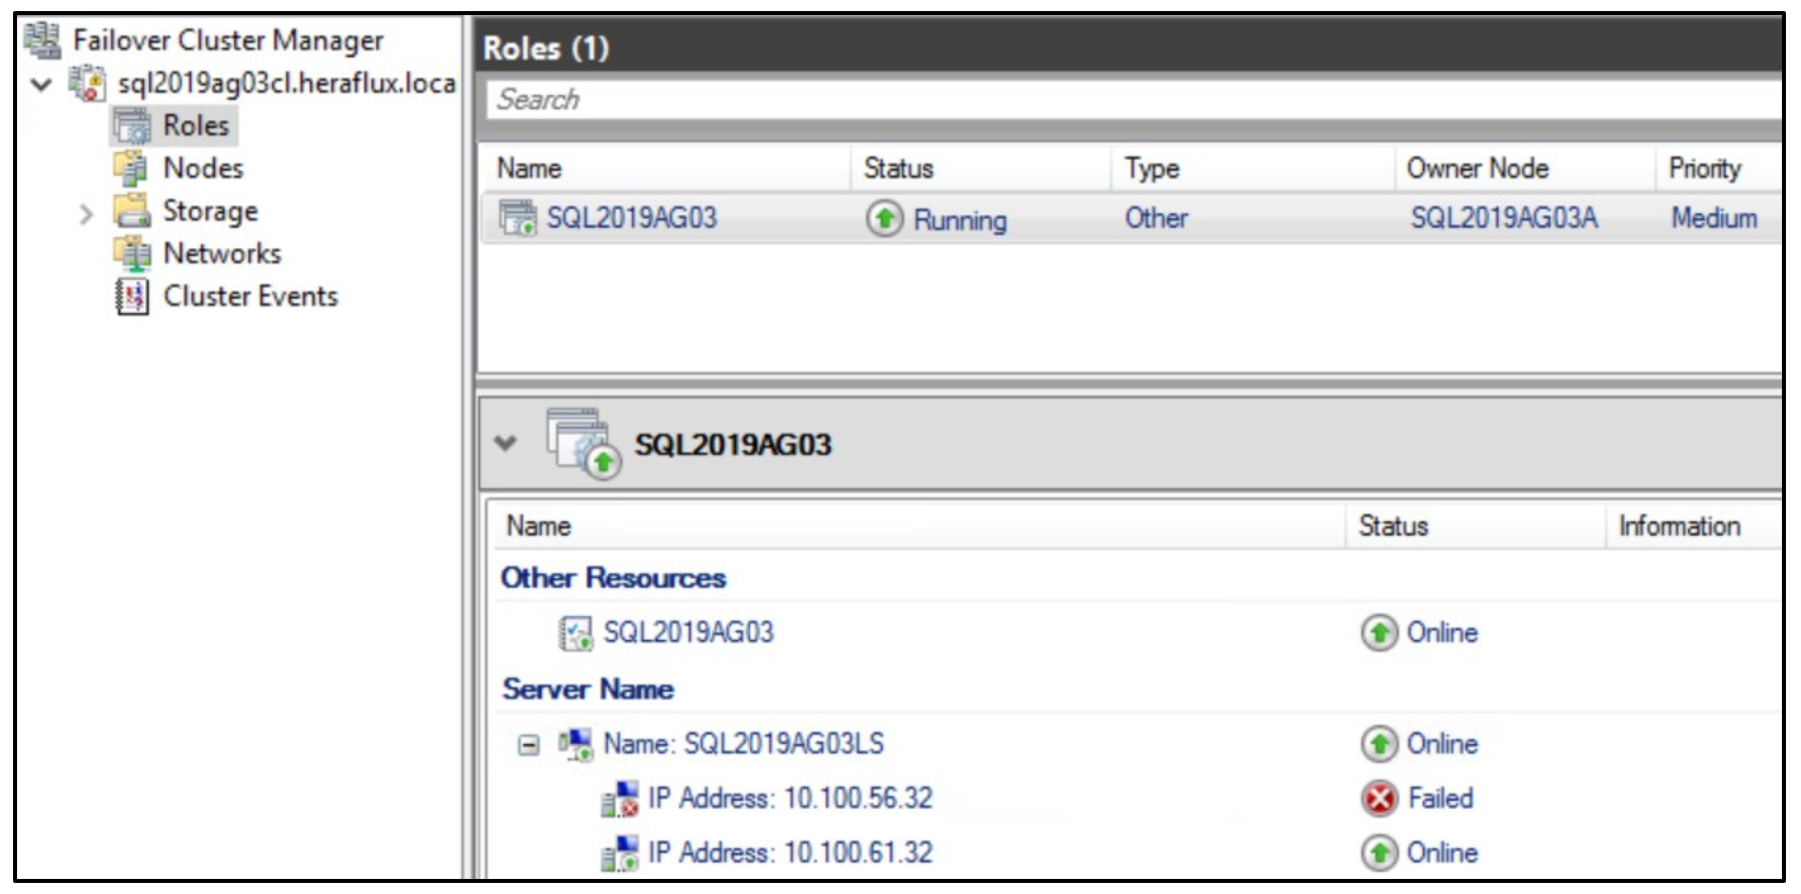
Both machines came up right away. I noticed in the Failover Cluster Manager that the new IP address was offline while the original was marked as failed.
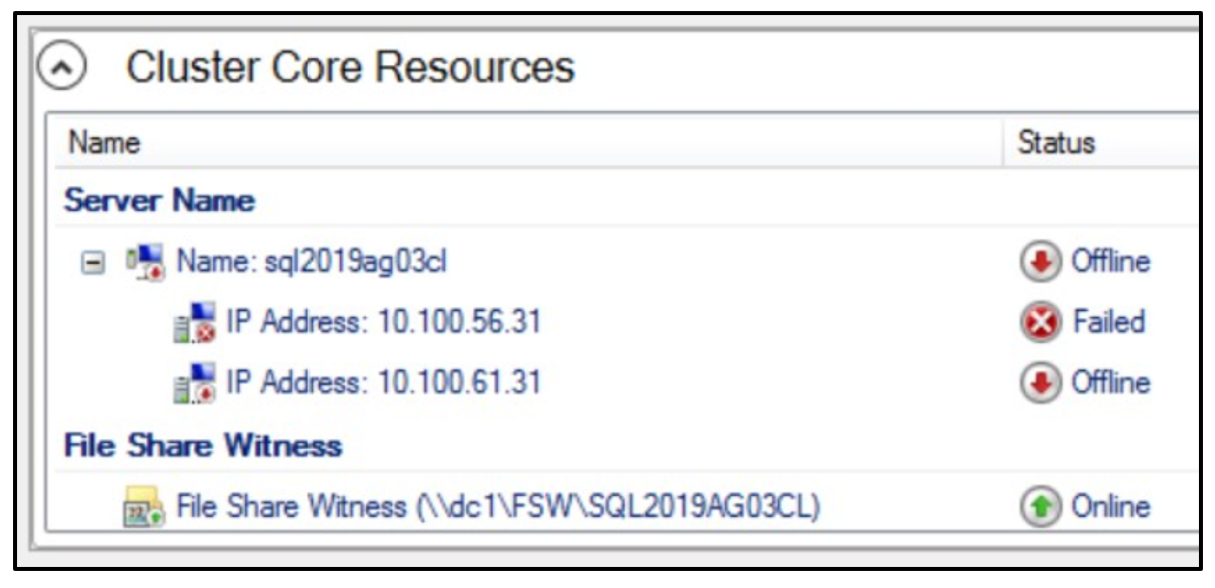
I simply right clicked and set the IP address corresponding with the DR subnet to online, and it came right up.

Success!

Click on Roles in the Failover Cluster Manager and you will see the AG. It should be online.

If you expand the resources at the bottom, you will see that the listener has adjusted its subnet and the second IP address is now online.
Check the AG dashboard in SQL Server. You should be up and running if the VMs were backed up or snapshotted at the same time.
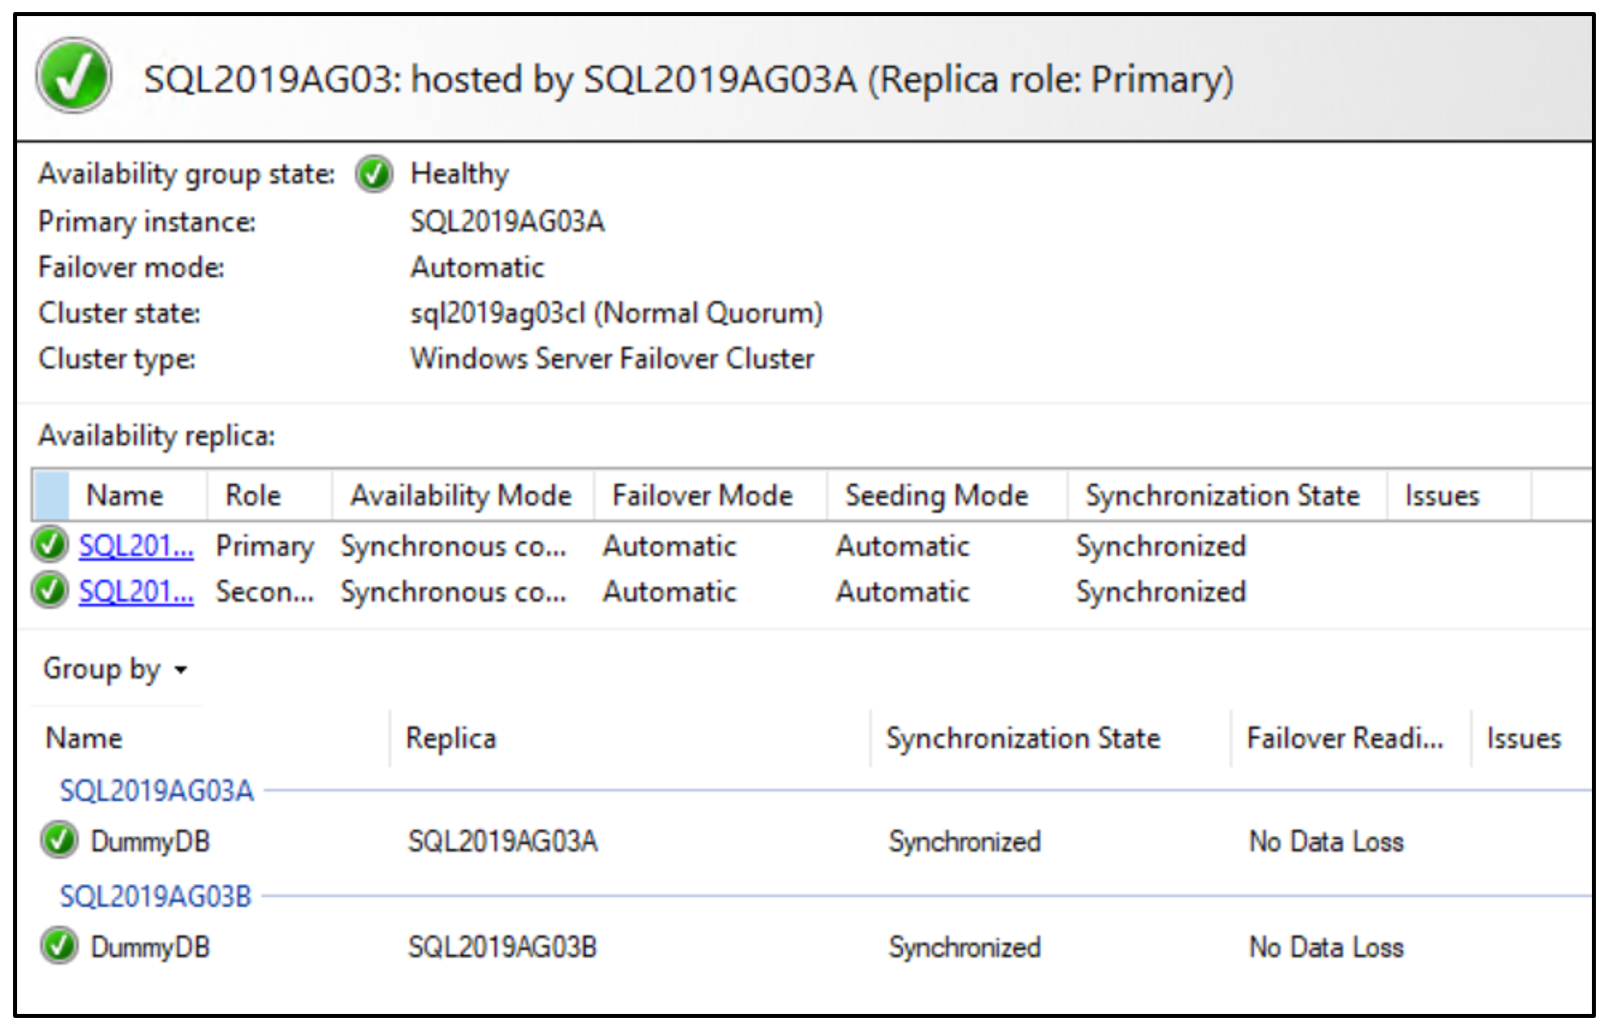
You’ve now successfully failed this set of servers, complete with the AG, over to your DR site!
NOTE: If you’re using legacy connection mechanisms, they might not be able to handle the multi-subnet failover feature. You’ll need to modify a listener setting called RegisterAllProvidersIP and set it equal to zero. More details are found at this post.
NOTE: This architecture WILL NOT WORK if you are using a public cloud provider as your DR destination. They require the use of a platform-specific load balancer that can better accommodate the network redirection layer. Stay tuned for more details on that in an upcoming post!
The post How to Prep a SQL Server Availability Group for VM-Level DR Replication first appeared on Convergence of Data, Cloud, and Infrastructure.

